PromptPay


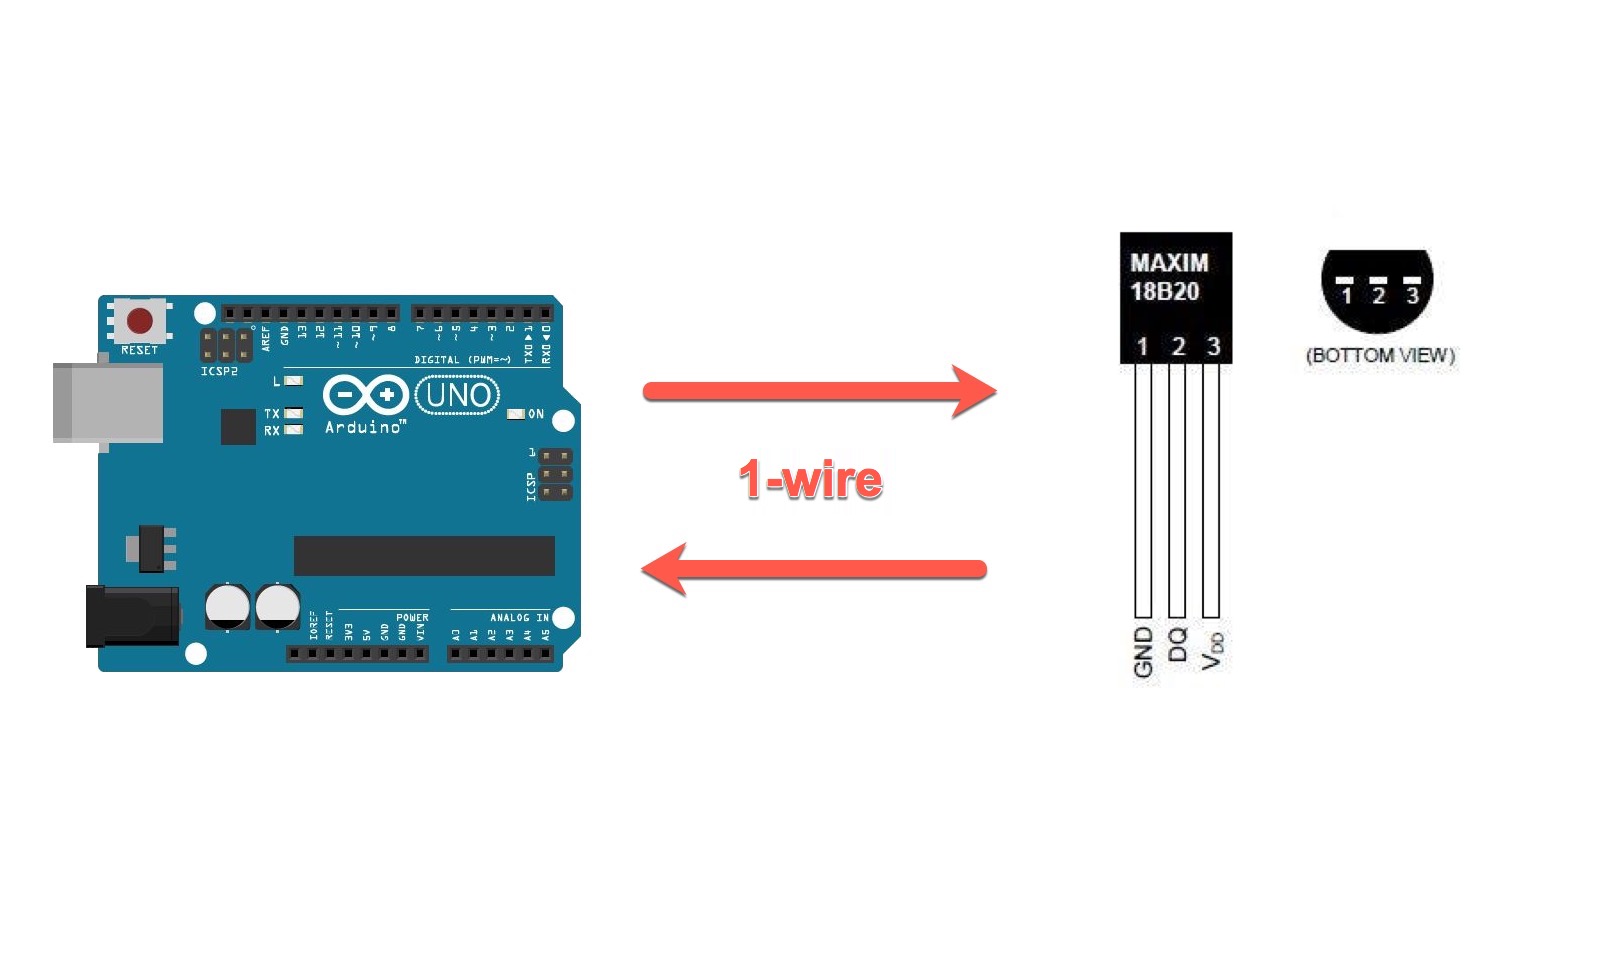
สวัสดีครับ ในบทความนี้จะมีเนื้อหาเกี่ยวกับวิธีการใช้งาน DS18B20 (Digital Temperature Sensor) กับ Arduino กันนะครับ เพื่อเรียนรู้การใช้งาน Arduino กับ Digital Temperature Sensor ผ่าน 1-Wire Protocol
DS18B20 คือ 1-wire digital temperature sensor ที่ผลิดโดย Maxim IC สามารถใช้วัดอุณหภูมิในหน่วยองศาเซลเซียสตั้งแต่ -55 to 125 (+/-0.5) (ความละเอียด 9 ถึง 12-bit) Sensor แต่ละตัวจะมี Serial number (unique 64-Bit Serial number) ที่ไม่ซํ้ากันอยู่เพื่อใช้ระบุ Address แต่ละตัวในกรณีที่เชื่อมต่อ Sensor หลายตัวในสาย Data เส้นเดียว (1-wire)
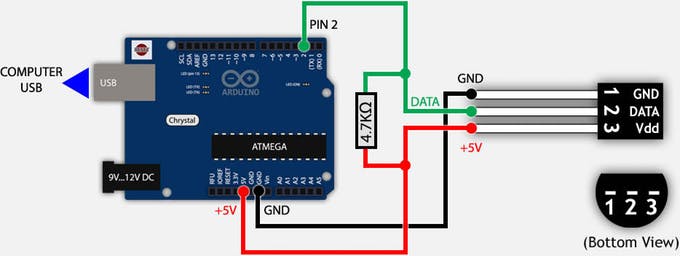
ให้เชื่อมต่อวงจรดังรูปครับ
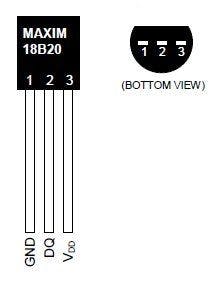
สําหรับ DS18B20 sensor จะมีอยู่ 3 ขาดังนี้
มีจุดสังเกตุคือในการต่อใช้งาน DS18B20 sensor จะต้องมีตัวต้านทานขนาด 4.7k Ohm ต่อ Pull Up เนื่องจาก DS18B20 sensor ใช้การสื่อสารแบบ 1-wire
Download Library สองตัวนี้มาก่อนะครับ
กลับไปที่ Arduino IDE เพื่อสร้าง Arduino Project ขึ้นมาโดยเข้าไปที่เมนู File—>new
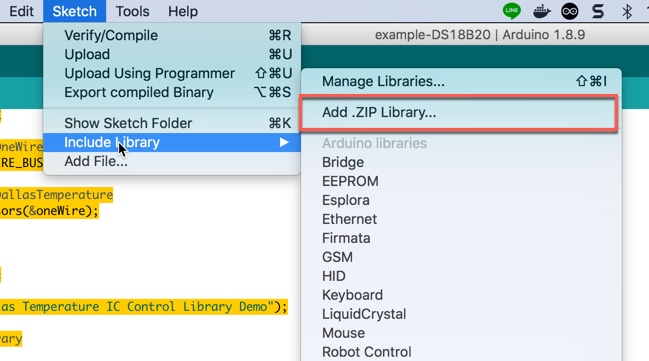
แล้ว Import Library ที่โหลดมา โดยเข้าไปที่ Sketch —> Include Library —> Add .ZIP Library
เมื่อทุกอย่างเรียบร้อยเราก็มาลงมือ Coding กันครับ
#include <OneWire.h>
#include <DallasTemperature.h>

// กําหนด Pin 2 สําหรับ รับ-ส่ง ข้อมูล
#define ONE_WIRE_BUS 2

// สร้าง Instance ของ OneWire
OneWire oneWire(ONE_WIRE_BUS);

// สร้าง Instance ของ DallasTemperature
DallasTemperature sensors(&oneWire);

void setup(void)
{
  // start serial port
  Serial.begin(9600);
  Serial.println("Dallas Temperature IC Control Library Demo");

  // Start up the library
  sensors.begin();
}

void loop(void)
{
  // Send the command to get temperatures
  sensors.requestTemperatures();

  Serial.print("Temperature is: ");

  // อ่านข้อมูลจาก DS18B20 พร้อมทั้งส่งข้อมูลไปแสดงผลที่ Computer ผ่าน Serial port
  Serial.println(sensors.getTempCByIndex(0));

  delay(1000);
}
จากตัวอย่าง Code ด้านบนมีการเรียกใช้ Library 2 ตัวคือ OneWire.h และ DallasTemperature.h ซึ่ง 2 ตัวนี้จะทํางานร่วมกันดังนี้ OneWire.h จะทําหน้าที่ส่ง และรับข้อมูลในรูปแบบ 1-wire และ DallasTemperature.h จะทําหน้าที่ควบคุมการอ่านและเขียนข้อมูลสําหรับ DS18B20 Sensor
การทํางานของโปรแกรมด้านบนคือ โปรแกรมจะอ่านข้อมูลจาก DS18B20 Sensor ทุกๆ 1 วินาที แล้วส่งข้อมูลที่อ่านได้ไปแสดงผลบนคอมพิวเตอร์ผ่าน Serial port
เมื่อลอง Compile และ Upload code ลงบน Arduino board แล้วดูผลลัพธ์ทาง Serial monitor ก็จะแสดงข้อมูลของอุณหภูมิทุกๆ 1 วินาที แบบนี้
ก็จะเป็นประมาณนี้นะครับ ติดตรงไหนสอบถามได้นะครับ สําหรับบทความนี้พอแค่นี้ก่อน แล้วเจอกันใหม่บทความหน้าครับ :)
ขอบคุณข้อมูล และรูปภาพจาก arduino.cc
บทความนี้ จะมาพูดถึง interface 3 ตัวนี้ IEnumerator, IEnumerable และ ICloneable ซึ่ง .net เตรียมไว้ให้เราไว้ใช้งาน โดยมีรายละเอียดดังนี้
คําสั่งที่ใช้ในการดู pin layout raspberry pi คือsudo gpio readallก็จะได้ layout มาแบบนี้
สวัสดีครับ ปกติแล้วเมื่อต้องการจะควบคุม Raspberry Pi เราก็จะต้องเชื่อมต่อ Raspberry Pi เข้ากับ Network แล้ว SSH ไปที่ Raspberry Pi แต่วันนี้เราจะมาใช้งาน SSH ผ่าน USB โดยไม่ต้องไปเชื่อมต่อกับ Network ให้ยุ่งยากวุ่นวาย เพียงแค่เรามีสาย USB เพียงเส้นเดียวก็สามารถ SSH เพื่อควบคุม Raspberry Pi ได้