PromptPay


สวัสดีครับ ในบทความนี้อธิบายถึงวิธีการ Tag และ push Image ที่เราสร้างขึ้นไปใว้ใน Docker Registry (hub.docker.com) ก่อนที่จะเริ่มเข้าเรื่อง ถ้าอ่านมาถึงตอนนี้แล้วยัง งงๆ ให้กลับไปอ่านเรื่อง สร้าง Docker Image ก่อนครับเพราะเนื่อหาในบทความนี้จะต่อเนื่องกันครับ ก่อน push image ของเราขึ้น Docker Registry ให้เราไปสมัคร account ของ hub.docker.com เมื่อเรียบร้อยผมจะอธิบายโดยแบ่งเป็นสองขั้นตอนดังนี้
ก่อนอื่นมาดูก่อน Tag ของ Image คืออะไร Tag จะมีไว้อธิบายเพิ่มเติมว่า Image ตัวนี้มีเป็นอย่างไร อาจจะบอกเป็นเลข Version หรืออะไรก็ตามแต่ผู้สร้าง Image นั้นๆจะกําหนด รูปแบบการเขียนชื่อและ tag ของ Image ใน Docker Registry คือ
<user>/<image name>:<tag>เช่น thiti/myimage:latest อธิบายได้ว่า image นี้เป็นของ user thiti ชื่อ image ว่า myimage และมี tag คือ latest ซึ่งหมายความว่า version ล่าสุด ก่อนที่จะแปะ image ก็ต้องเตรียม Image ให้พร้อมก่อน เมื่อ Image พร้อมแล้วก็เริ่มแปะ tag image โดยใช้คําสั่งนี้

เมื่อใช้ แปะ tag เรียบร้อย ลองใช้คําสั่ง docker images ก็จะเห็น Image ที่เราแปะ tag ไว้
เราต้อง login Docker Registry ก่อน ด้วยคําสั่ง
docker loginระบบจะให้ใส่ user และ password
$ docker login
 Login with your Docker ID to push and pull images from Docker Hub. If you don't have a Docker ID, head over to https://hub.docker.com to create one.
 Username:
 Password:
 Login Succeeded
เมื่อ login เรียบร้อย ก็สั่ง push ได้เลย โดยใช้คําสั่ง
docker push <ชื่อ image พร้อม tag>ตัวอย่าง
$ docker push maryatdocker/docker-whale
     The push refers to a repository [maryatdocker/docker-whale] (len: 1)
     7d9495d03763: Image already exists
     c81071adeeb5: Image successfully pushed
     eb06e47a01d2: Image successfully pushed
     fb434121fc77: Image successfully pushed
     5d5bd9951e26: Image successfully pushed
     99da72cfe067: Image successfully pushed
     1722f41ddcb5: Image successfully pushed
     5b74edbcaa5b: Image successfully pushed
     676c4a1897e6: Image successfully pushed
     07f8e8c5e660: Image successfully pushed
     37bea4ee0c81: Image successfully pushed
     a82efea989f9: Image successfully pushed
     e9e06b06e14c: Image successfully pushed
     Digest: sha256:ad89e88beb7dc73bf55d456e2c600e0a39dd6c9500d7cd8d1025626c4b985011
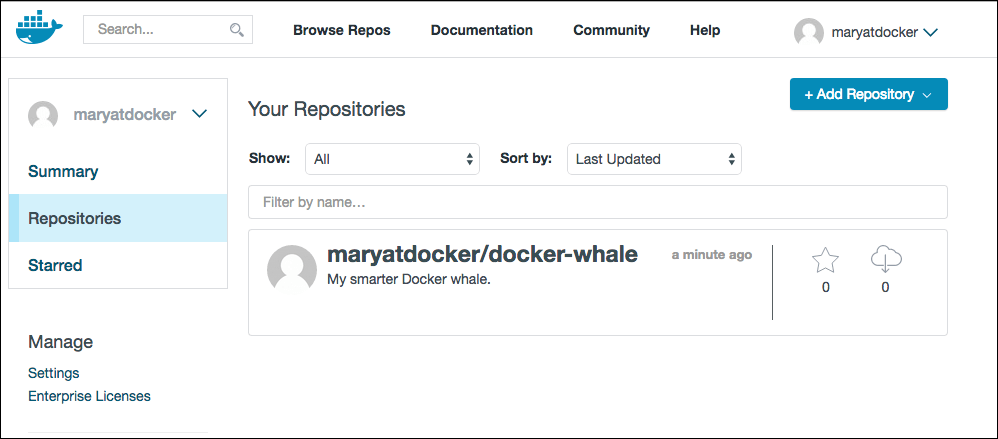
เมื่อทุกอย่างเรียบร้อย ใน Docker hub จะมี image ของเราขึ้นมาประมาณนี้


ขอบคุณที่มาของข้อมูลและรูปภาพ docs.docker.com
ประวัติความเป็นมา จังหวัดชัยนาทชัยนาทแปลตามศัพท์มีความหมายว่า "ชัยชนะที่มีเสียงบันลือ" เป็นเมืองโบราณเมืองหนึ่ง ตัวเมืองเดิมอยู่บริเวณฝั่งขวาแม่น้ำเจ้าพระยาที่ปากคลองแพรกศรีราชา ใต้ปากน้ำเก่า สันนิษฐานว่าคงจะสร้างขึ้นในสมัยพญาเลอไทครองกรุงสุโขทัยระหว่าง พ.ศ.
หลังจากที่ Raspberry pi ได้ออก OS Raspbian Jessie Kernal version 4.1 เมื่อ 18-03-2016 วิธีการ Config static ip address แบบเดิม วิธี config ip ใน linux ไม่สามารถใช้งานได้
โดยปกติแล้ว Class ต่างๆจะมี Method เป็นของตัวเองอยู่แล้ว แต่ถ้าเราต้องการจะเขียน Method เพิ่มเติมเข้าไป ในกรณีที่เราเป็นเจ้าของ Source code เราสามารถแก้ไข Source code ของเราได้เลย แต่ถ้าในกรณีที่เราไม่ได้เป็นเจ้าของ Source code เรามีเพียงแค่ dll ไฟล์เท่านั้น เราจะทําอย่างไร? ใน .net 3.0 ขึ้นไป เราสามารถเพิ่ม Method เสริมให้กลับ Class ที่ถูกสร้างไว้แล้วได้ โดยจะเรียกว่า Extension Method