PromptPay


สวัสดีครับ ใน EP.2 เราได้เรียนรู้ Syntax ของภาษา Dart กันไปแล้ว สําหรับเนื้อหาต่อไปในบทความนี้จะเป็นเรื่อง Widget ซึ่งเป็นพื้นฐานที่จําเป็นต้องรู้ในการเขียน Mobile application ด้วย Flutter
ใน Flutter จะเรียกทุกๆส่วนในหน้าจอเป็น Widget ทั้งหมดเช่น ปุ่มต่างๆ, Text Input ฯลฯ โดยในแต่ละ Widget จะสามารถมี Widget ที่เป็น parent และ child ได้ และเมื่อนำ Widget มาต่อกันเป็น tree จะเรียกว่า Widget Tree

ประเภทของ Widget จะแบ่งออกเป็น 2 ประเภท คือ Stateless Widget และ Stateful Widget แล้วคําว่า State คืออะไร? State ก็คือ สถานะ หรือค่าของตัวแปรใน Object ใด Object หนึ่ง ซึ่งจะสามารถเปลี่ยนแปลงค่าได้
Stateless Widget คือ Widget ที่รับค่ามาแล้วแสดงผลเพียงอย่างเดียวโดยหลังจาก Build ขึ้นมาแล้วจะไม่สามารถเปลี่ยนค่าตัวแปร(State) หรือ Reload Widget ได้ หมายความว่า Stateless Widget จะไม่มี Interaction ใดๆ กับ User
สําหรับการสร้าง Stateless Widget ก็ไม่ยากครับ คือ extends StatelessWidget แล้วก็ Override method build() ซึ่งจะ return Widget กลับไป จะสังเกตว่า ไม่มีส่วนของ State เข้ามาเกี่ยวข้องเลย
class HelloWidget extends StatelessWidget {
  @override
  Widget build(BuildContext context) {
    return WidgetA(); // Return WidgetA ออกไป
  }
}
Stateful Widget คือ Widget ประเภทที่เมื่อ Build ขึ้นมาแสดงแล้ว สามารถ Rebuild หรือเปลี่ยนแปลงค่าของ State ภายในได้ ทําให้ Widget ประเภทนี้สามารถ Interaction กับ User ได้เช่น TextField , CheckBox ฯลฯ
สําหรับการสร้าง Stateful Widget จะต่างจากการสร้าง Stateless Widget นิดหน่อยครับ ตรงที่ Stateful Widget จะไม่มีการ Override method build() แต่จะมีส่วนของ Class State เพิ่มเติมขึ้นมา ซึ่งเราจะต้อง Override Function createState() และ Return Class State ออกมา ตามตัวอย่างด้านล่าง
class HelloWidget extends StatefulWidget {
  @override
  _HelloWidgetState createState() => _HelloWidgetState();
}

class _HelloWidgetState extends State<HelloWidget> {

  @override
  void initState() {
    // init something.
    super.initState();
  }

  @override
  Widget build(BuildContext context) {
    return WidgetB(); // Return WidgetB ออกไป
  }
}
การเข้าถึงตัวแปรใน Stateful Widget Class จาก State Class เช่น ถ้าเราต้องการจะส่ง Title เข้ามาใน Stateful Widget Class แล้วมาเรียกใช้ State Class ตัวอย่าง
class HelloWidget extends StatefulWidget {

   final String title;
   HelloWidget(this.title);

   @override
  _HelloWidgetState createState() => _HelloWidgetState();
}

class _HelloWidgetState extends State<HelloWidget> {

  @override
  Widget build(BuildContext context) {
    return Text(widget.title);
  }
}
และถ้าต้องการเปลี่ยนแปลงค่าในตัวแปร title สามารถใช้ setState() ได้ตามตัวอย่างนี้
setState((){
   title = "New title";
});
เพื่อให้เห็นภาพรวมลองดูตัวอย่าง Code ด้านล่างครับ
import 'package:flutter/material.dart';
void main() {
runApp(MyApp());
}
class MyApp extends StatelessWidget {
// This widget is the root of your application.
@override
Widget build(BuildContext context) {
return MaterialApp(
title: 'Flutter Demo',
theme: ThemeData(
// This is the theme of your application.
//
// Try running your application with "flutter run". You'll see the
// application has a blue toolbar. Then, without quitting the app, try
// changing the primarySwatch below to Colors.green and then invoke
// "hot reload" (press "r" in the console where you ran "flutter run",
// or simply save your changes to "hot reload" in a Flutter IDE).
// Notice that the counter didn't reset back to zero; the application
// is not restarted.
primarySwatch: Colors.blue,
// This makes the visual density adapt to the platform that you run
// the app on. For desktop platforms, the controls will be smaller and
// closer together (more dense) than on mobile platforms.
visualDensity: VisualDensity.adaptivePlatformDensity,
),
home: MyHomePage(title: 'Flutter Demo Home Page'),
);
}
}
class MyHomePage extends StatefulWidget {
MyHomePage({Key key, this.title}) : super(key: key);
// This widget is the home page of your application. It is stateful, meaning
// that it has a State object (defined below) that contains fields that affect
// how it looks.
// This class is the configuration for the state. It holds the values (in this
// case the title) provided by the parent (in this case the App widget) and
// used by the build method of the State. Fields in a Widget subclass are
// always marked "final".
final String title;
@override
_MyHomePageState createState() => _MyHomePageState();
}
class _MyHomePageState extends State<MyHomePage> {
int _counter = 0;
void _incrementCounter() {
setState(() {
// This call to setState tells the Flutter framework that something has
// changed in this State, which causes it to rerun the build method below
// so that the display can reflect the updated values. If we changed
// _counter without calling setState(), then the build method would not be
// called again, and so nothing would appear to happen.
_counter++;
});
}
@override
Widget build(BuildContext context) {
// This method is rerun every time setState is called, for instance as done
// by the _incrementCounter method above.
//
// The Flutter framework has been optimized to make rerunning build methods
// fast, so that you can just rebuild anything that needs updating rather
// than having to individually change instances of widgets.
return Scaffold(
appBar: AppBar(
// Here we take the value from the MyHomePage object that was created by
// the App.build method, and use it to set our appbar title.
title: Text(widget.title),
),
body: Center(
// Center is a layout widget. It takes a single child and positions it
// in the middle of the parent.
child: Column(
// Column is also a layout widget. It takes a list of children and
// arranges them vertically. By default, it sizes itself to fit its
// children horizontally, and tries to be as tall as its parent.
//
// Invoke "debug painting" (press "p" in the console, choose the
// "Toggle Debug Paint" action from the Flutter Inspector in Android
// Studio, or the "Toggle Debug Paint" command in Visual Studio Code)
// to see the wireframe for each widget.
//
// Column has various properties to control how it sizes itself and
// how it positions its children. Here we use mainAxisAlignment to
// center the children vertically; the main axis here is the vertical
// axis because Columns are vertical (the cross axis would be
// horizontal).
mainAxisAlignment: MainAxisAlignment.center,
children: <Widget>[
Text(
'You have pushed the button this many times:',
),
Text(
'$_counter',
style: Theme.of(context).textTheme.headline4,
),
],
),
),
floatingActionButton: FloatingActionButton(
onPressed: _incrementCounter,
tooltip: 'Increment',
child: Icon(Icons.add),
), // This trailing comma makes auto-formatting nicer for build methods.
);
}
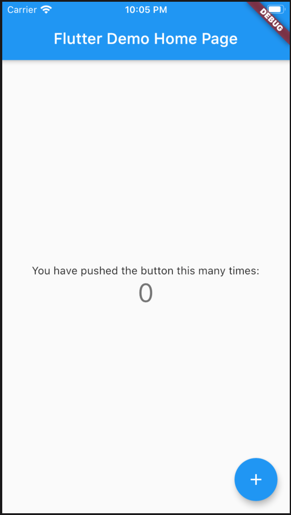
}จะได้หน้าจอประมาณนี้ครับ
สําหรับเนื้อหาของ Widget ใน EP นี้ก็มีประมาณนี้ครับ
แล้วพบกัน EP หน้านะครับ ขอบคุณครับ
สวัสดีครับ บทความนี้ผมจะพูดถึงเรื่อง Docker compose ซึ่งผมมองว่ามันเป็นหัวใจหลักของ Docker เลยก็ว่าได้เพราะมันจะช่วยให้การจัดการ Docker ทั้ง project ของเราเป็นเรื่องง่าย ก่อนที่จะอ่านบทความนี้จะต้องรู้ใน
Template Literals คือ ความสามารถหนึ่งของ javascript ที่เราสามารถใช้ String ภายในเครื่องหมาย grave accent (อยู่ที่ปุ่มเปลี่ยนภาษา) ได้เช่น
สวัสดีครับ ในบทความนี้เราจะมาทําความรู้จักกับคําว่า Zero-Day กันครับว่าคืออะไร มาเริ่มกันเลยครับ